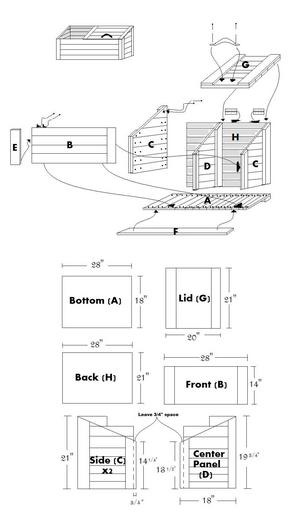
Firewood boxes have been around for centuries. Build your own firewood box for wood, kid’s toys, or just to hold your muddy shoes and wet umbrellas. My design features a covered bin for storing wood and an open side bin for kindling. It’s built out of cedar in order to avoid that wet wood smell.
Before you get started, you may need to check out a lumber and hardware store to gather materials.
Materials list:
11 Cedar 1×4″ @ 10′
2 Brass butt hinges
1 box ¼” galvanized screws
1 Brass handle
1 gallon Clear varnish
Brush and rags
Tools:
Cordless screw gun with 1/8″ bit and Phillips bit
Sand paper or Palm Sander
2 Bar Clamps
Framing Square
Start by cutting the bottom boards first. Using the circular saw, cut seven pieces of the 10′ 1×4’s to a length of 17 ¼” each. Cut the two running boards at 28″. Set these pieces aside and label them “A”. You will assemble those later.
Now we need to cut the front of our firewood box. Cut two 1×4’s at 14″and four 1×4’s at 26 ½”long. Now set these aside and label them “B”. We will assemble them later, with the rest of our panels.
Now for the sides: Cut eight pieces 17 ¼”. Cut 4 pieces at 9″. Cut the four corner boards, two at 21″ and two more at 18″ long. Set these aside and label them “C”.
You will cut the center panels similar to the sides, except the corner boards will be shorter in length. Cut 4 pieces at 17 ¼” and 2 pieces at 9″. Cut the two corner boards at 19 ¾” and 17″. Don’t worry about the angles, we will cut them in a minute. Set these pieces aside and label them “D”.
Now the final panel, the back. Using the circular saw, cut six 1×4’s 28″ long. Label these parts “H”
Now to begin the assembly process: Take the parts labeled “A”. Place all seven boards’ short side together. Take the two bar clamps and gently squeeze the boards in place. Use two pieces of dunnage between the bar clamps and the boards to prevent denting the finished product. Make sure you place the clamps on the side so you can attach the corner boards. Place the square on each corner and align the boards until all four sides are square. Tighten the clamps. Place the runner boards on each side and countersink two galvanized screws 1½” into each board. Once you complete the fastening, take off the clamps and set part “A” aside.
Continue on to panel “B”. Take the four 26 ½” boards and squeeze them together in the clamps. Place the two 14″ corners and secure them to the planks hanging each side over ¾”. Use a small ¾” scrap for a gauge.
Assemble panel “C”. Place the four of the eight 17 ¼” pieces and stack the together place two of the four 9″ pieces at the top. Clamp them all together. Square up the corners and fasten the corner boards with screws. Attach the 21″ corner board flush to the long side. Attach the 18″ corner board to the short point and let it hang over ¾”. Mark a chalk line from the long point of the panel to the short side of the panel, outside to outside. Cut off the line using a circular saw. Repeat the same process over for the other side panel, except mirror the other panel.
Panel “D” is the same as panel “C” except it is smaller. Assemble the panel in the same manner as in the last two steps.
Grab panel “A” and both panel “C’s”. Attach each panel “C” to both ends of panel “A”. You may need someone to help you hold the panel while you screw them together. Make a mark from the inside of the bottom 4″. This is where you will attach the middle panel “D”. Attach this panel now with the screw gun. Use a diagonal brace to hold the sides and center panel square. Use the framing square to align each panel and tack into the side of the panel through the brace.
Place the last boards “H” against the panels “C” and “D” and attach each of them together with the galvanized screws. Make sure that each bin is square before setting the screw.
Attach the front panel “B” to the firewood box. Countersink all the screws. Now you have a nearly completed box.
Place the lid “G” on top of the bin and attach the brass hinges to the lid and the box. Try fastening the hinges onto the lid first, then set the lid on the box and fasten the hinges into place. Attach the handle to the front of the lid.
You can finish your firewood box with whatever stain or varnish you wish to use. Clear coats last longer but require several coats.
