With the advent of e-cards, receiving traditional paper greeting cards is more special than ever. Sure, sending cards electronically is less expensive, quicker, and, more environmentally friendly. But there’s nothing like holding a real paper card in your hand that someone took the time to buy, fill out, attach postage and send it via snail mail to you. For these reasons, I decided to start keeping and organizing my cards in a creative manner. Read this instructive article and learn how to make a homemade greeting card scrapbook!
1. Gather Together Your Paper Greeting Cards and Materials
I waited until I had quite a few greeting cards before I sat down one evening to start my scrapbook. I gathered together a scrapbook, scissors, tacky tape, a glue stick, some assorted, decorative scrapbook paper, a pack of magic markers and a pack of stickers.
Your scrapbook can be any size you wish. The most popular size seems to be twelve inches.
You can find scrapbook supplies most anywhere nowadays. The local Big Lots stores carry quite a selection, and they’re all reasonably priced. Scrapbook stores carry larger selections of books, stickers, paper, et cetera, but they’re usually high priced unless you get materials on sale. Hobby stores also carry scrapbook supplies. And, you can also search the Internet.
2. Plan Your Basic Strategy
If you’re really into organization, you can make a scrapbook for each holiday or each sender. I decided to simply put all my cards together in one book. I did arrange the cards by date, though. That way, as I flip through them, I can review the year month-by-month as the holidays occur- New Year, Anniversary, Easter, Mother’s Day, Halloween, Birthday and Christmas, for example.
To make a homemade greeting card scrapbook, I also decided to place two or more small cards on each page. You can dedicate a page to each card, if you prefer. But, the way I laid out my cards, this was more space-efficient.
3. Lay Out Each Greeting Card
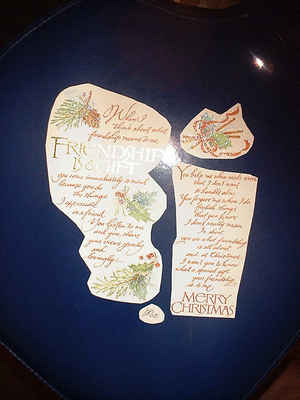
You can leave each card as it is and place that into your scrapbook. I decided I wanted to keep only the most important parts of the cards. That is, I only wanted to capture the essence of the cards. If you take a look at my picture, you’ll see what I mean. The example is a Christmas card I had received. I cut out the important parts of the card- the greeting card verse and the graphics on the front, the inside verse and graphics, and the signature. I didn’t want any white space as that detracts from the card.
4. Glue the Greeting Card on the Decorative Paper and Finish
Finally, to make a homemade greeting card scrapbook, I’ll arrange the card on a piece of decorative paper. Then I’ll add stickers and more graphics to personalize it. I could even add a small picture of the sender to make the page more special.
5. Proper Storage of Your Greeting Card Scrapbook
Store your card scrapbook out of direct sunlight in a cool, dry place. It should last for many years to come, and serve as a beautiful reminder of holidays gone by and the endearing people in your life!
