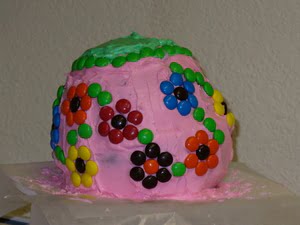
This cake was inspired by a similar cake on the M&M;’s website, it has been provided as a supporting link. The template for the handle and spout for the teapot are located on this site and their recipe for the cake and decorating suggestions. The recipe in this article will focus on the assembly and decoration of the cake.
The recipe calls for a one quart bowl, and 2 pound cake mixes. Instead, one standard cake mix any flavor can be used, a pound cake consistency can be achieved by adding one complementing flavor of family sized pudding mix and an extra egg. The quart size bowl is necessary to achieve the proper shape.
To transport the teapot cake a standard “cake keeper” may not be quite tall enough. To get around this a storage container or deep bowl with a lid can be used to hold the cake instead, provided the bowl or container is wide enough to pass over the cake without marring the frosting. The cake will sit on the lid, and the bowl or container will act as the cover for the cake.
Put It In The Oven, Mark It With A B
The cake can turn out too crunchy on the out side because the outside cooks faster than the middle, due to the shape of the bowl. There are two ways to get around this, one is to cook the cake in a water bath deep enough to nearly cover the entire sides of the bowl. This will help it to cook more evenly and more gently. An alternative is to wrap the bowl in aluminum foil, this should keep the outside of the cake from cooking too quickly.
Also, there is no need to use two glass one quart bowls to bake each half in, simply fill the bowl with about half of the cake mix leaving one inch from the top of the bowl (for the cake to rise). Refrigerate the remaining cake mix until the first cake is finished baking, cooled in the bowl, and able to be transferred to the cooking rack.
Greasing the bowl is very important, the cake will not release from the bowl and therefore will not create the correct shape if the bowl is not adequately oiled. Also, the cake will crumble easily if removed from the bowl too quickly or trimmed before it has cooled completely to room temperature.
The Frosting
The frosting is easy enough to make or use, the only trick really is coloring the frosting and spreading the frosting. To color the frosting, the most vibrant colors will be achieved with gel food coloring. Wal-Mart carries gel food coloring in their craft section in most stores, this could be a place to find it, if it isn’t available at a local grocery store.
The colors are very true, and a small amount of the gel coloring really goes a very long way in the frosting. Also using a regular frosting is advisable compared to a whipped version, the frosting must be stirred so much to mix in the coloring, the whipped frosting will end up too “loose” to frost the cake properly. Store the frosting at room temperature until ready to use, or slightly cooler. The refrigerator would be too cold and the frosting would not spread properly.
The frosting, according to the instructions, will be made in two colors, a base color and an accenting color. If the person decorating the cake wanted to pipe frosting leaves on the M&M; flowers, the secondary color should be green.
Assembling The Cake
Assembling the cake is harder than the directions on the M&M;’s website made it look, for someone with no experience baking cakes or decorating them. To make this easier I would suggest letting the cakes cool completely in the bowl, then trimming the tops flat using the bowl as a guide and a sharp serrated edge knife.
Prepare the platter (lid to the storage container/bowl or cake keeper) with a paper doily (9 inch doily), frost the bottom of the cake (the part it will sit on) with a thin layer of frosting and center it on the doily.
Place wide strips of wax or parchment paper on each side of the cake to cover the doily (this will help keep frosting off the doily for a prettier presentation). Lightly frost the top of the cake only, this should give enough for the cakes to stick together but not slide apart. Before setting the second cake on top, cut four drinking straws to equal size, they should be about two and a half inches tall.
Place these straws in the top cake about one inch from the edge of the cake at the north, east, south, and west edge of the cake. Then carefully place the top cake onto the bottom cake, skewering the bottom cake with the straws. Pile most of the remaining frosting on top of the top cake.
Thoroughly frost the cake making a smooth globe shape. Placing the M&M; decorations on the cake is just a matter of placing the candies on the cake as the picture on the website suggests. It may make decorating faster to separate the candies by color in separate small plastic cups.
For the lid of the teapot draw a circle with a butter knife in the base color frosting. Once the circle is centered trace the circle with the secondary frosting color. Place corresponding colored candies or a complementing color candies around this circle, then fill in the lid with the secondary frosting color.
If transporting the cake or if not serving for hours, wait until just presenting the cake to add the lollipop lid topper and the card stock handle and spout.
